How Does Tamping Work In Harmony With Grind Size And Dosing?
|
|
Time to read 3 min
Brew better with Brewedco - $9.95 flat rate shipping
Brew better with Brewedco - $9.95 flat rate shipping
Brew better with Brewedco - $9.95 flat rate shipping
Brew better with Brewedco - $9.95 flat rate shipping
Brew better with Brewedco - $9.95 flat rate shipping
Brew better with Brewedco - $9.95 flat rate shipping
Brew better with Brewedco - $9.95 flat rate shipping
Brew better with Brewedco - $9.95 flat rate shipping
Brew better with Brewedco - $9.95 flat rate shipping
Brew better with Brewedco - $9.95 flat rate shipping
Brew better with Brewedco - $9.95 flat rate shipping
Brew better with Brewedco - $9.95 flat rate shipping
Written by: Laurie Nance
|
Published on
|
Time to read 3 min
Ever wondered why your espresso tastes different even when you're using the same coffee beans?
Sometimes the smallest changes in your espresso prep can throw everything off. And the tricky part is, it doesn’t always come down to just one thing. Tamping, grind size, and dosing all work together. And if even one of those is slightly off, it throws the whole shot out of balance.
Let me walk you through what I’ve noticed, and what you can do to make them work with each other, not against.
Grind size shapes how water flows through your coffee bed. A finer grind means more resistance, which slows the flow. A coarser grind? That speeds things up.
When the water flows too quickly, you're left with a weak, under-extracted shot. Too slow, and it gets bitter or muddy. I used to chase flavours by adjusting tamp pressure, but honestly? It made more sense once I started focusing on grind first.
A great starting point is to grind just fine enough that you hit a 25 to 30 second shot time. Don’t obsess over hitting a magic number. Taste is still your best guide.
There’s another article that explains how grind size affects the taste and flow of espresso really clearly.
I used to go by volume. Just filling the basket to the top before tamping. It looked right, but the results weren’t consistent. It turns out, density changes with grind size. So one day I’d get a 17g dose, the next it might be 15.5g from the exact same scoop.
Measuring by weight was a big shift. Not only was I able to control my yield better, but it helped me build repeatability.
Using a scale changed everything. I usually dose between 18g and 20g depending on the basket, but once that weight is locked in, it removes one variable entirely.
[collection-carousel="scales"]
To help with neat, accurate dosing, using something like a dosing tool really helps funnel the coffee where it belongs.
[collection-carousel="dosing-tools"]
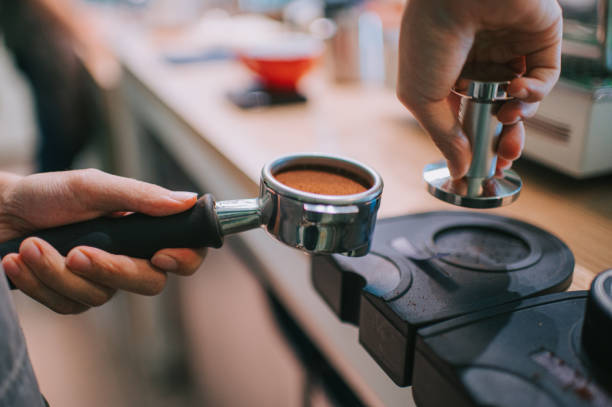
I used to think tamping meant pressing as hard as possible. I’ve since learned that the consistency matters more than the pressure. Uneven tamping causes channeling where water finds the path of least resistance, leaving some grounds under-extracted and others over-extracted.
These days I rely on a self-leveling tamper to make the process foolproof. It removes guesswork and helps create an even surface every time.
[collection-carousel="self-leveling-tamper"]
You could absolutely do it by hand, but I found it too easy to tilt slightly or apply uneven force. That small mistake compounds once water hits the puck.
If the coffee isn’t distributed evenly before tamping, you’re already in trouble. What I’ve seen is that even with a great tamp, uneven grounds below the surface can still cause channeling or spurting.
That’s where distribution tools come in like WDT tools, which let you break up clumps and settle grounds uniformly in the basket.
[collection-carousel="wdt-tool-distribution-tools"]
I used to think they were overkill, but after switching to a bottomless portafilter, I saw the results with my own eyes. A perfectly tamped puck that was poorly distributed would still spurt like crazy. No one wants that.
If I had to explain it simply: dosing sets the foundation, distribution makes it stable, tamping seals the deal, and grind controls the pace.
They’re all connected. You can’t change one and expect the rest to magically work themselves out. That’s why I always test grind size first, weigh every dose, use distribution tools, and tamp evenly.
It doesn’t have to be overcomplicated. The goal is repeatable, tasty espresso and if something’s off, change one variable at a time. Start with grind, then move to dose, and finally tamp. Never all at once.
Home baristas often think they need commercial machines to pull great shots. What I’ve found instead is that the right tools make the biggest difference especially ones made for your specific setup.
If you're using a Breville, DeLonghi, Gaggia, or Rocket machine, there are barista kits designed to fit your gear exactly.
[collection-carousel="barista-kits"]
And if you’re looking to upgrade or fill out your espresso station, you can always browse through the full range to find what suits your style.
If you’re stuck trying to figure out what’s going wrong in your workflow whether it’s uneven extractions, sour shots, or just plain inconsistency reach out. You can contact us here and we’ll help you troubleshoot your setup.

I'm the founder of Brewedco Coffee™, passionate about coffee, coffee tools, and helping others better understand how to utilize them. With years of experience in the coffee industry, I love sharing insights on brewing techniques, choosing the right equipment, and the science behind making the perfect cup.
Thanks for subscribing!
This email has been registered!